
# docker部署教程
注意:不按流程或者安装版本不正确,请自行解决!!!
- 依然部署不成功的人看这里:顺序是什么?顺序就是从上到下,从大写的一,从小写的1开始,这就是顺序!按照顺序部署就可以成功!(抱歉,问的人太多所以加上这一句)
# 一、克隆代码
git clone https://gitee.com/mao-peng/MangoTestingPlatform.git
# 二、修改配置
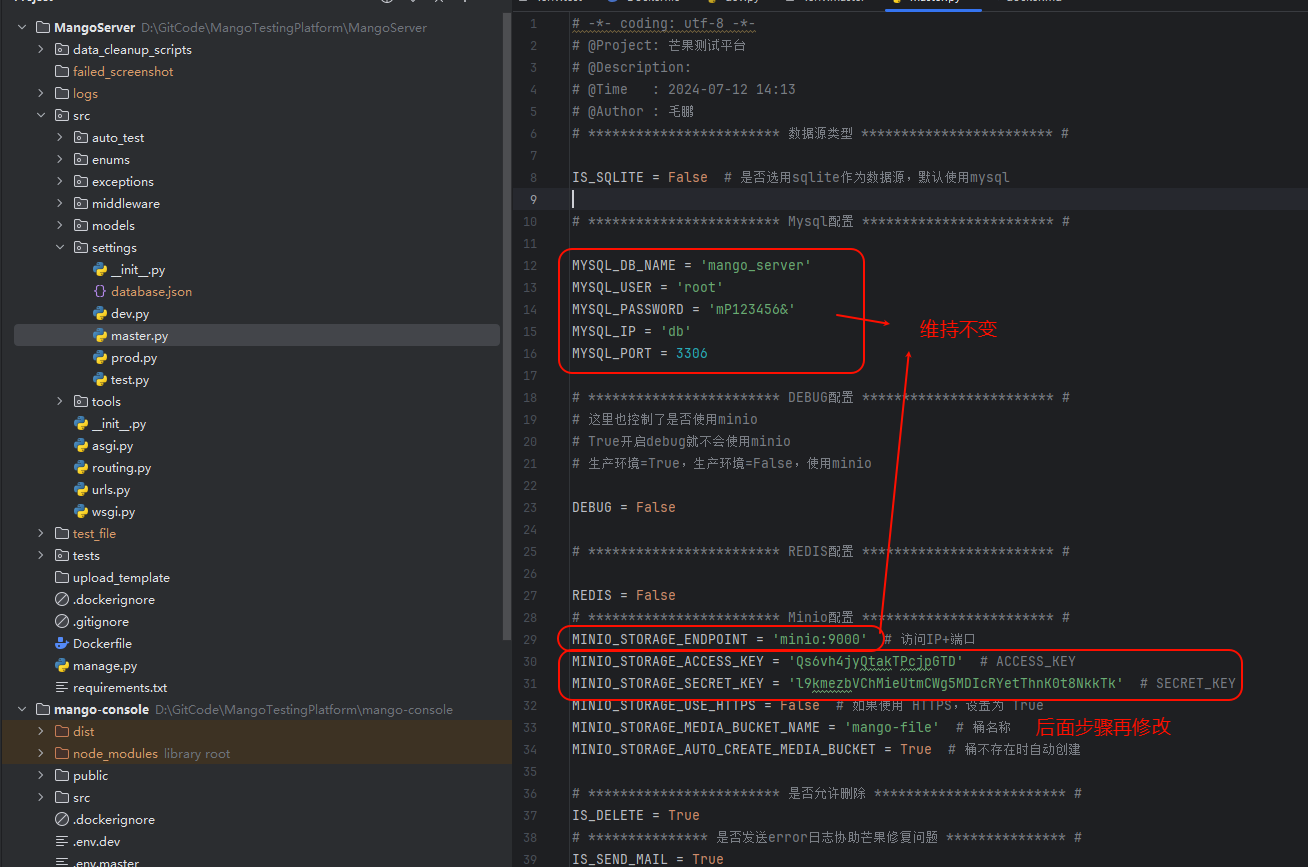
# 1.修改MangoServer配置(只需要阅读,方便自定义)
- 只需要阅读即可,方便下面修改
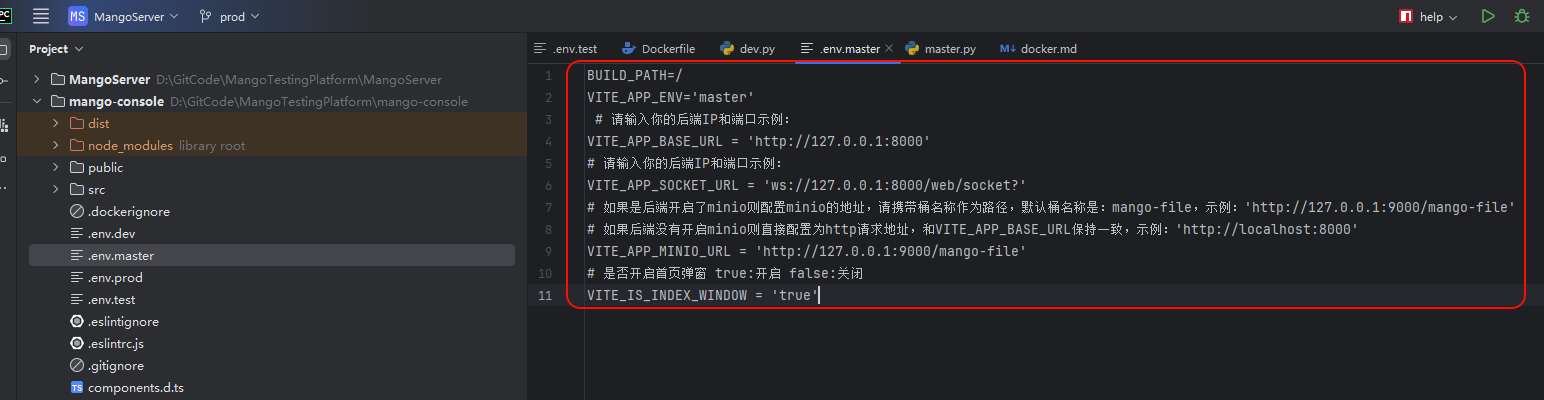
# 2.修改mango-console配置(注意:需要修改)
- 填写外网可以访问的后端服务的IP
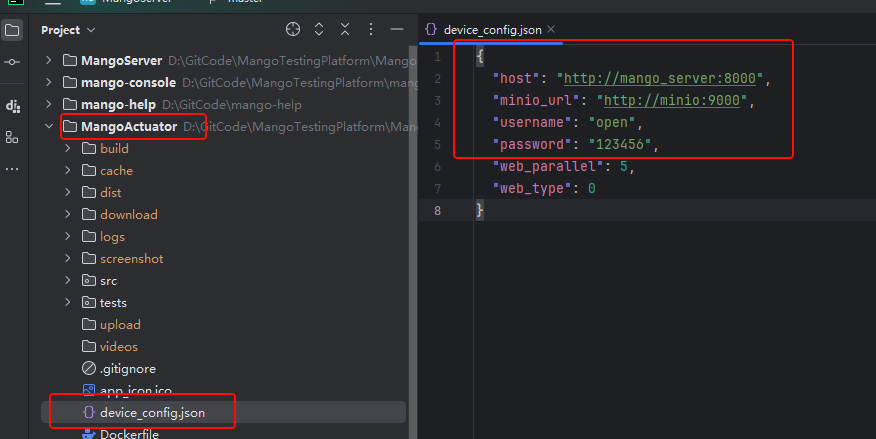
# 3.修改MangoActuator配置(只需要阅读,方便自定义)
- 只需要阅读即可,如果需要做UI自动化的分布式,增加测试效率则按需修改
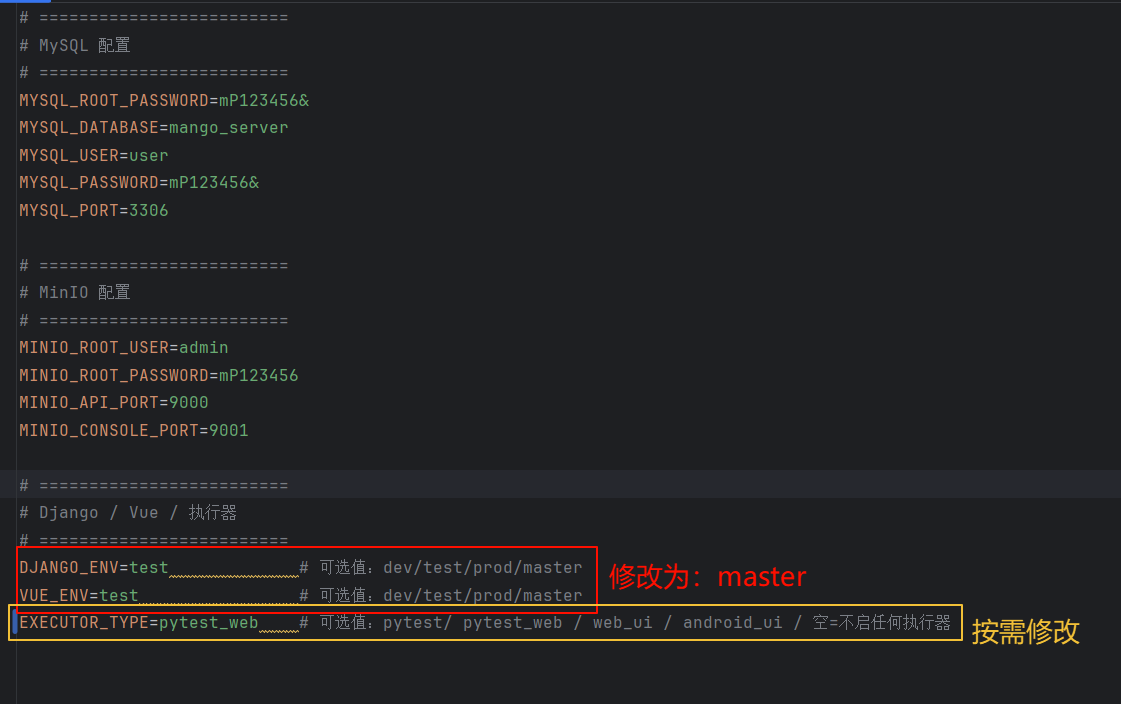
# 4.修改.env中的环境启动环境
- 建议只修改DJANGO_ENV和VUE_ENV=master,其他不改
# 三、安装docker和必要的镜像
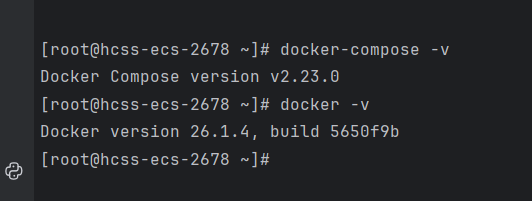
# 1.安装docker和docker-compose
- 安装docker和docker-compose的网上教程很多,作者就不提供了
- 下面是作者使用的版本,因为作者没有用过其他,所以不确定是否有版本冲突
# 2.安装必要的中间件
# 直接复制执行
docker pull mcr.microsoft.com/playwright/python:v1.43.0
docker pull python:3.10-slim-bullseye
docker pull node:18.20.5-alpine3.21
docker pull mysql:8.0.40-debian
docker pull minio/minio:RELEASE.2024-12-18T13-15-44Z.fips
docker pull nginx:stable-alpine3.20-perl
docker images
结果如下:
REPOSITORY                            TAG                                 IMAGE ID       CREATED          SIZE
python                                3.10-slim-bullseye                  639a7ede685a   2 months ago     125MB
nginx                                 stable-alpine3.20-perl              0d2df1337eb4   6 months ago     84.8MB
minio/minio                           RELEASE.2024-12-18T13-15-44Z.fips   6a25d78f6103   8 months ago     153MB
python                                3.10.16-alpine                      2a80925da4ce   8 months ago     51.1MB
node                                  18.20.5-alpine3.21                  87a8a7369c75   8 months ago     127MB
mysql                                 8.0.40-debian                       e1bbd335faf6   10 months ago    610MB
mcr.microsoft.com/playwright/python   v1.43.0                             1fea83c002eb   16 months ago    1.94GB
# 四、启动服务
# 1.启动服务
cd 项目根目录 # 示例:cd /code/MangoTestingPlatform
sh start_service.sh
执行完成,打印如下
# ...省略部分内容
 => [mango_server 6/6] RUN echo "构建后端服务:master"                                                                                                                                                                               0.2s
 => [mango_actuator internal] load build definition from Dockerfile                                                                                                                                                           0.0s
 => => transferring dockerfile: 32B                                                                                                                                                                                           0.0s
 => [mango_actuator internal] load .dockerignore                                                                                                                                                                              0.0s
 => => transferring context: 2B                                                                                                                                                                                               0.0s
 => [mango_actuator internal] load metadata for mcr.microsoft.com/playwright/python:v1.43.0                                                                                                                                   0.0s
 => [mango_actuator internal] load build context                                                                                                                                                                              0.0s
 => => transferring context: 7.82kB                                                                                                                                                                                           0.0s
 => [mango_actuator pytest_web 1/6] FROM mcr.microsoft.com/playwright/python:v1.43.0                                                                                                                                          0.0s
 => CACHED [mango_actuator pytest_web 2/6] WORKDIR /app                                                                                                                                                                       0.0s
 => CACHED [mango_actuator pytest_web 3/6] RUN pip config set global.index-url https://mirrors.tuna.tsinghua.edu.cn/pypi/web/simple                                                                                           0.0s
 => CACHED [mango_actuator pytest_web 4/6] COPY linux_requirements.txt dynamic_requirements.txt pytest_requirements.txt ./                                                                                                    0.0s
 => CACHED [mango_actuator pytest_web 5/6] RUN pip install --no-cache-dir -r linux_requirements.txt -r dynamic_requirements.txt -r pytest_requirements.txt                                                                    0.0s
 => CACHED [mango_actuator pytest_web 6/6] COPY . .                                                                                                                                                                           0.0s
 => CACHED [mango_actuator final 1/2] WORKDIR /app                                                                                                                                                                            0.0s
 => CACHED [mango_actuator final 2/2] RUN echo "构建执行器:pytest_web"                                                                                                                                                             0.0s
[+] Building 0.0s (0/0)                                                                                                                                                                                             docker:default
[+] Running 6/6
 ✔ Network mangotestingplatform_app_network         Created                                                                                                                                                                   0.0s
 ✔ Container mangotestingplatform-minio-1           Healthy                                                                                                                                                                   0.0s
 ✔ Container mangotestingplatform-mango-console-1   Started                                                                                                                                                                   0.0s
 ✔ Container mangotestingplatform-db-1              Healthy                                                                                                                                                                   0.0s
 ✔ Container mangotestingplatform-mango_server-1    Started                                                                                                                                                                   0.0s
 ✔ Container mangotestingplatform-mango_actuator-1  Started                                                                                                                                                                   0.0s
Performing system checks...

System check identified no issues (0 silenced).
September 02, 2025 - 11:34:39
Django version 4.1.5, using settings 'src.settings'
Starting ASGI/Channels version 3.0.5 development server at http://0.0.0.0:8000/
Quit the server with CONTROL-C.
Operations to perform:
  Apply all migrations: auth, auto_api, auto_pytest, auto_system, auto_ui, auto_user, contenttypes
Running migrations:
  No migrations to apply.
[2025-09-02 11:34:43] [ERROR] 报错提示:git地址,账号或密码未配置,请先配置, 报错内容:None
[2025-09-02 11:34:43,864] [INFO]: {'code': 200, 'msg': '登录成功', 'data': {'name': 'open', 'userName': 'open', 'userId': 352, 'roleId': None, 'token': 'eyJhbGciOiJIUzI1NiIsInR5cCI6IkpXVCIsInR5cGUiOiJqd3QifQ.eyJpZCI6MzUyLCJ1c2VtZSI6Im9wZW4iLCJuYW1lIjoib3BlbiIsImV4cCI6MTc1Njg3MDQ4M30.yUhBGgK8yhuRqGkQghVlRlMm8YKsedZZ_WmekvzM0kQ', 'selected_project': 1, 'selected_environment': 2, 'roles': [{'description': None, 'roleId': None, 'roleName': None}]}, 'totalSize': None}
[2025-09-02 11:34:43,872] [INFO]: ws连接成功,开始获取数据!
# 2.启动成功之后登录minio,修改服务器的minio配置
- http://localhost(注意:IP是你自己的):9001/ 账号密码查看第二步的:修改配置->修改.env中的环境启动环境
- 登录上去之后创建minio的ACCESS_KEY和SECRET_KEY
- 填写到MangoServer项目的配置文件的minio配置中 ,再执行-> sh start_service.sh 再次发版
# 3.浏览器访问
- http://localhost(注意:IP是你自己的):8001/ 则部署成功,账号自己注册
# 4.UI自动化必要的步骤
- 你本机需要看到UI自动化执行效果
- 你不需要在本机看到UI自动化执行效果
- 那就忽略这一步骤,但是需要注意,只有用例的执行执行器才会帮助你执行,所以直接组装成用例再点执行即可
# 五、作者发布版本之后,你这边同步发版操作
到项目根目录执行下面命令即可
sh start_service.sh
docker-compose build --no-cache(全部重新构建,如果有需要就执行这个,非必须执行)
# 六、首次启动注意
- 1.访问域名,示例:http://localhost(注意:IP是你自己的):8001/
- 2.登录账号是你注册的账号
- 3.UI自动化请下载 网盘下载 (opens new window)后登录,域名是后端域名,账号密码是注册的账号密码